
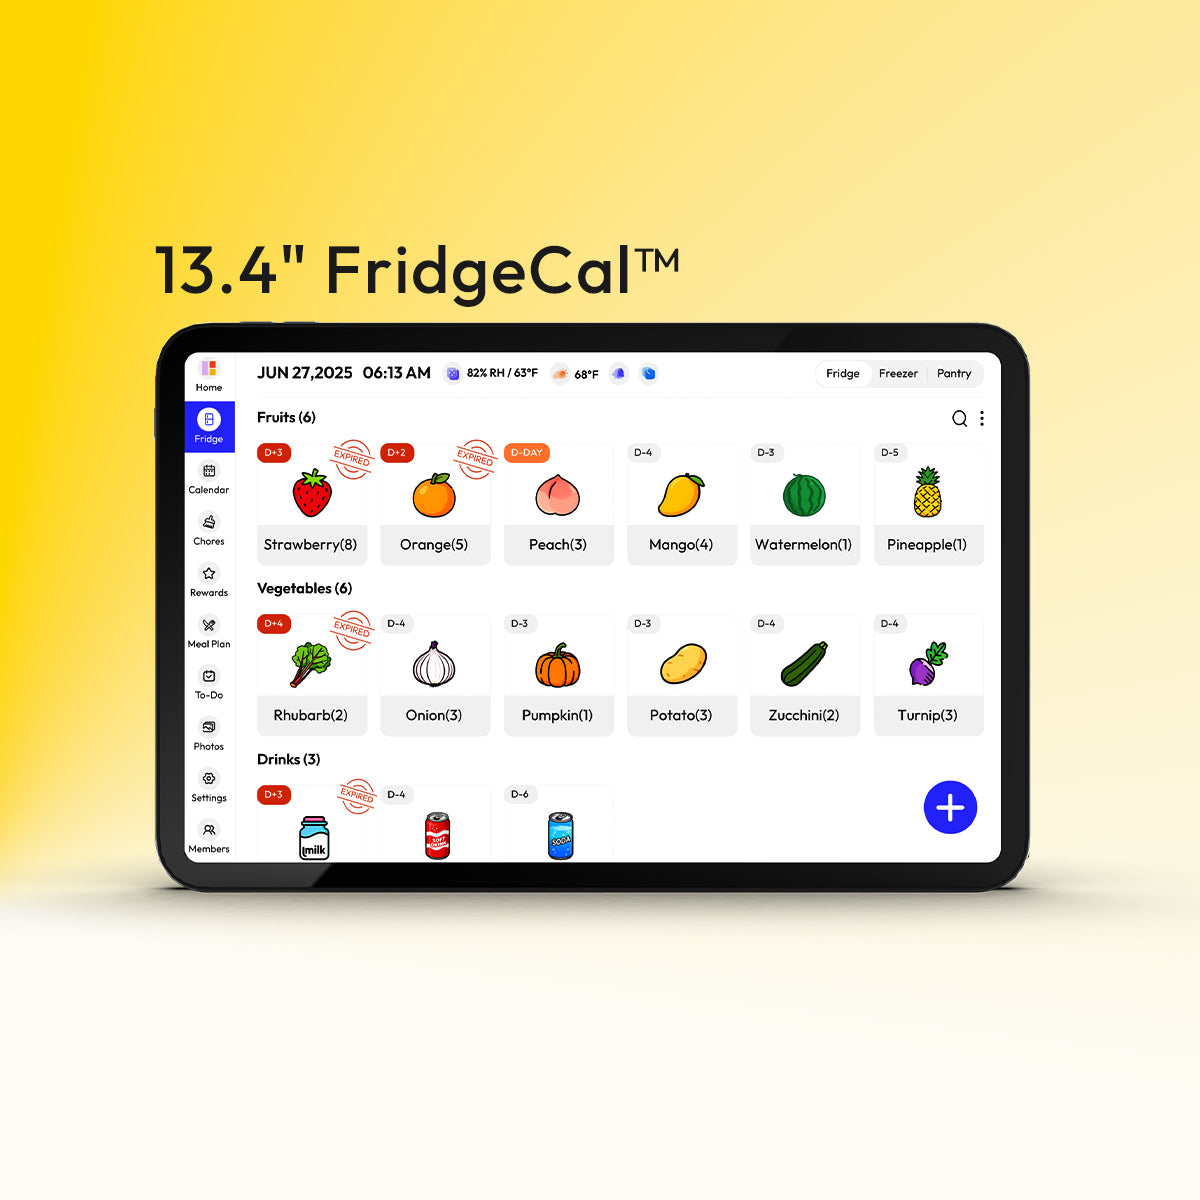


You bought a small screen because your family needed one place to look. Not another app. Not another sticky note. One shared display for the school schedule, dinner plan, chores, and the stream of little reminders that keep a household moving.
Then the practical question shows up. Where should it go, and what’s the right wall mount for 24 inch tv use when the screen isn’t for movie night, but for everyday family life?
That’s a different project than mounting a bedroom TV. In a kitchen, hallway, or family drop zone, the screen has to be easy to glance at, hard for kids to bump, safe around cords, and comfortable to read while standing. A good mount makes that possible. The wrong one turns a helpful home hub into something awkward, wobbly, or always in the way.
Mounting Your Family's Command Center
Most advice about a wall mount for 24 inch tv setups assumes you’re creating an entertainment area. The screen faces a sofa. The goal is relaxation. The mount choice revolves around comfort for long viewing.
Family command centers work differently.
In a busy kitchen, one parent might check the calendar while packing lunches. A child might look up the after-school routine before putting on shoes. Someone else might glance at the grocery list on the way out the door. The screen isn’t the star of the room. It’s part of how the room functions.
That’s why more families are searching for this kind of setup. Content still leans heavily toward entertainment installs, but kitchen and command-center use has become more common. One cited trend says 'kitchen TV mount' queries show projected year-over-year growth of 15% in post-2025 data, even though most guides still skip issues like child-safe placement and moisture concerns in kitchens (Mount-It).
Why this project feels different
A family hub has a different job description:
- It needs quick visibility. You should be able to read it in passing, not only when seated.
- It needs safer placement. Curious hands, backpacks, and kitchen traffic change the risk level.
- It needs cleaner power management. A command-center screen usually stays plugged in all the time.
- It needs to fit your routines. Meal planning, school pickups, and chore check-ins happen in motion.
A small screen mounted well can calm a room down. Mounted poorly, it becomes one more thing people work around.
If you’re still deciding whether a kitchen wall is the right place, it helps to look at examples of a Google Calendar wall mount setup for family routines. Seeing the idea in a family context often makes the mount decision much clearer.
The goal isn’t just getting it on the wall
The primary goal is making the screen feel like it belongs there.
That usually means a mount that keeps the display secure, close enough to the wall for a tidy look, and positioned where adults can use it easily without putting it in a child’s path. Once you think of the screen as a household tool instead of a TV, the rest of the decisions get easier.
Is This Mount Compatible Understanding VESA and Weight
The most confusing part of buying a wall mount for 24 inch tv models is usually the technical language on the box. The good news is that compatibility comes down to two checks. VESA pattern and weight capacity.
If those two match your screen, you’re in good shape.
What VESA actually means
VESA is the pattern of mounting holes on the back of the screen. It's similar to matching the bolt pattern on a wheel. If the pattern doesn’t line up, it won’t attach correctly.
Most mounts for this size category support VESA patterns from 75x75mm to 400x400mm, and smaller displays such as a 21.5-inch family hub typically use 75x75mm or 100x100mm. If the pattern doesn’t match, the display can’t be securely attached, so verifying it is essential (Mounting Dream).

How to check the pattern
You don’t need special knowledge for this. You just need the back of the screen and a tape measure.
- Look for four mounting holes on the back panel.
- Measure horizontally from the center of the left hole to the center of the right hole.
- Measure vertically from the center of the top hole to the center of the bottom hole.
- Write it in millimeters. If you measure about 100mm by 100mm, that’s VESA 100x100.
If your screen manual lists the VESA pattern, use that. If not, measuring works fine.
Practical rule: Never buy a mount based only on screen size. The hole pattern is what decides whether the bracket fits.
Weight matters too
After VESA, check the screen’s weight and compare it with the mount’s weight rating. At this stage, many parents think, “It’s only a small screen, so any mount should work.” That’s not a safe assumption.
A mount must support the screen comfortably, not barely. You want room for confidence, not a setup that’s operating right at the limit. If the product page says the mount supports your display’s weight and the VESA pattern matches, you’ve cleared the two most important tests.
A quick compatibility checklist
Before you order, confirm these four points:
- VESA match: The screen’s hole pattern appears in the mount’s supported range.
- Weight rating: The mount is rated to hold your display safely.
- Wall type: The mount’s hardware fits your wall situation.
- Screen use: A fixed, tilt, or articulating design matches how your family will use it.
Once those are clear, the decision stops feeling technical and starts feeling manageable.
Choosing the Right Mount Type for Your Family
On a busy school morning, this screen is less like a TV and more like the family’s wall calendar, reminder board, and traffic signal. The best mount is the one that keeps that information easy to see, hard to bump, and simple to live with every day.
For a 24-inch command center in a kitchen or hallway, mount choice affects more than appearance. It changes how far the screen sticks into the room, whether a child can grab the edge, how readable the display is while you are standing, and how neatly you can manage a power cord that stays connected all the time.
The three common styles are fixed, tilting, and full-motion.

Fixed mounts for calm, low-profile setups
A fixed mount holds the screen close to the wall and keeps it there. That makes it a strong fit for narrow hallways, small kitchen nooks, and any spot where people pass by with backpacks, grocery bags, or laundry baskets.
A fixed mount works like a framed bulletin board. It stays put, looks tidy, and does its job without asking for attention. That stability is often a good match for a family command center, especially if the screen will always face one main standing area.
Some fixed mounts have a very slim profile, while some full-motion models extend much farther into the room, with options across these styles listed in the same general budget range at Lowe's. For busy family zones, less projection usually means fewer accidental bumps.
Tilting mounts for standing-height viewing
A tilting mount adds a small but helpful adjustment. It lets you angle the screen downward or upward.
That matters more for a command center than for a couch-viewing TV. In many kitchens, the best wall space is slightly higher than eye level because counters, outlets, and cabinets limit your options. A gentle downward tilt can make a shared calendar easier to read while packing lunches or checking the day’s schedule.
If you are still deciding how high the screen should sit, this guide on ideal kitchen touchscreen mounting height can help you match the mount type to the way adults and kids will use the screen.
Tilt also helps with glare. If a nearby window or ceiling light reflects on the display, changing the angle a few degrees can make the screen much more readable without relocating it.
Full-motion mounts for flexible rooms
A full-motion mount extends, swivels, and usually tilts. It gives you the most control, which can be useful if your family checks the screen from more than one spot.
For example, you might want the display turned toward the island during meal prep, then angled toward the breakfast table during homework time. If you want to plan your room's TV setup before choosing that kind of reach, a layout tool can help you picture whether the arm will feel useful or in the way.
This style has tradeoffs. More movement means more hardware, more depth, and more attention to cable slack. In a tight hallway or near a doorway, that extra reach can create a small obstacle right where your family needs clear walking space.
Which mount usually works best?
| Mount Type | Flexibility | Best For | Keep in Mind |
|---|---|---|---|
| Fixed | Low | Hallways, narrow walls, simple command centers | Stays close to the wall and reduces bump risk |
| Tilting | Medium | Kitchens or walls where the screen sits a little high | Improves readability for standing use and glare control |
| Full-motion | High | Multi-use kitchens, corners, or rooms with two viewing zones | Extends farther out and needs more thoughtful cable planning |
A simple way to choose
Start with your family’s real routine.
Choose fixed if the screen will always face one spot and you want the safest, neatest profile. Choose tilt if the wall location is slightly high and readability matters more than swivel. Choose full-motion if you know your family will regularly turn the screen, and you have enough clearance to do that without creating a snag point or a visual distraction.
For many homes, fixed or tilting feels better over time. A command-center screen usually works best when it is steady, easy to glance at, and tucked neatly into the rhythm of the room.
Planning Your Placement for Function and Safety
A good wall mount for 24 inch tv use starts with the right spot. Placement decides whether the screen helps the room or interrupts it.
For a family command center, the best wall isn’t always the first empty wall you notice. You’re balancing visibility, traffic flow, child safety, and access to power.

Start with how the screen will be used
Stand where you naturally check household information. Near the coffee station? By the mudroom door? Beside the kitchen island? Those are better clues than aesthetics alone.
If the screen is for daily coordination, place it where adults already pause for a moment. That’s usually better than tucking it into a decorative corner no one faces.
A quick sketch can help before you drill anything. If you want to plan your room's TV setup visually, a layout tool can help you test sightlines and wall options before making the final call.
Keep safety in the picture
This part matters more than parents sometimes expect. A smaller screen may look harmless, but in a busy family zone it still needs secure placement.
Mounts for this screen size are commonly built around 16-inch stud spacing, which aligns with the standard in over 90% of U.S. homes. That’s one reason a small-screen install can often be done efficiently. The same source notes that single-stud mounts rated for 44 lbs can be installed in 20 to 30 minutes, while lightweight 24-inch panels often average 15 to 25 lbs (Sam's Club).
The practical takeaway is simple. Mount into a stud whenever possible, especially in spaces where kids, doors, and bags create constant movement.
A family-friendly placement checklist
- Check reach: Place the screen where small children can’t tug on it or hit the corners easily.
- Check glare: Stand there at morning and evening light if you can.
- Check traffic: Open doors, walk past it, and imagine backpacks brushing the wall.
- Check power: The screen should be close enough to an outlet for clean cable routing.
- Check ventilation: Leave enough room around the screen so it doesn’t feel boxed in.
If you’re figuring out where a touchscreen-style family display should sit for standing adults and school-age kids, this guide to ideal kitchen touchscreen mounting height is a useful reference point.
Here’s a walkthrough if you want to see the planning mindset in action before you grab the drill:
Use the wall like an installer would
A stud finder helps you verify what’s behind the drywall. Mark the stud center, not just the stud edge. Then hold the mount template up with painter’s tape and live with it for a day if you need to.
Mounting height should fit the way your family actually reads the screen, not the way a living room TV usually gets installed.
That one pause can save you from a placement mistake that bothers you every morning.
Gathering Your Tools for a Smooth Installation
A smooth install usually depends less on skill and more on preparation. If the right tools are within reach, the project feels calm. If you’re stopping to search for a drill bit with holes already marked on the wall, it gets frustrating quickly.
Your basic success kit
Here’s what most parents need on hand:
- Stud finder: This helps you locate solid framing behind the drywall. It’s one of the most important tools for a secure install.
- Tape measure: You’ll use it to center the mount, confirm height, and double-check spacing.
- Level: A mount can be securely installed and still look wrong if it’s crooked. The level prevents that.
- Pencil: For clear, erasable wall marks.
- Drill and drill bits: The drill creates pilot holes so screws go in cleanly and with less strain.
- Socket wrench or screwdriver: Many mounts use lag bolts or bracket screws that need firm tightening.
- Painter’s tape: Useful for holding templates in place and marking wall positions without making a mess.
- A helper: Even a small screen is easier to hang when one person lifts and the other guides.
What usually comes with the mount
Most mount kits include the wall plate, the bracket arms, and a bag of hardware. That often covers screws, washers, and spacers for different screen backs.
Still, don’t assume every screw in the bag is right for your screen. Compare the hardware against your screen’s mounting holes and your wall type before you begin.
Clean installs happen when you lay everything out first and check each part before the drill comes out.
One more practical check
If your project involves working near an outlet, light switch, or any area where wiring might be present, be cautious. General home-safety habits matter here, and these safe ceiling fan wiring tips are a good reminder of how careful you should be anytime you’re drilling near electrical pathways.
A few minutes of setup saves a lot of patching later.
A Guide to Mounting Your TV on the Wall
This part feels bigger than it is. Most installs become manageable when you treat them as three separate jobs. Prepare the wall. Prepare the screen. Then bring the two together.
Prepare the wall
Start by holding the wall plate or paper template where you want the screen. Use your level. Then use it again. A tiny tilt at this stage becomes very obvious once the screen is up.
Mark the drill points carefully. If you’re mounting into a stud, pilot holes help the lag bolts go in straight and reduce strain on the wall material. A small trick many DIYers like is taping a folded paper pouch or bag below the drill point to catch dust.
Before tightening the wall plate fully, pause and confirm that it still sits level. It’s much easier to correct this now than after the screen is attached.
Prepare the screen
Lay a blanket or soft towel on a table or floor and place the screen face-down carefully. Attach the mount brackets to the back using the hardware that fits your display correctly.
Don’t force a screw that feels wrong. If a screw is too long, too short, or doesn’t thread smoothly, stop and compare the other included hardware. The bracket should sit flat and secure without wobble.
A few things help here:
- Keep screws sorted: Put each hardware type in a separate small cup or dish.
- Use spacers if needed: Some screen backs are curved or recessed, and spacers help the bracket sit evenly.
- Tighten evenly: Alternate sides instead of fully tightening one side first.
Hang and secure the screen
With the wall plate installed and the screen brackets attached, lift the screen onto the mount. This is the moment when a second person makes life much easier.
One person can hold the weight while the other guides the hooks, rails, or locking tabs into place. Once the screen is hanging, engage any safety screws or locking mechanisms included with the mount. These small parts are easy to overlook and very important in family spaces.
After the screen is mounted, do three checks:
- Level check: Step back and confirm the screen looks straight.
- Stability check: Gently test for unwanted movement.
- Function check: If it’s a tilt or full-motion mount, move it slowly and make sure nothing rubs or catches.
The calm, careful approach works best
You don’t need to rush. In fact, most crooked or frustrating installs happen because someone skips a recheck that would have taken one extra minute.
Mounts rarely fail because a parent couldn't handle the tools. Problems usually start with rushed measuring, missed studs, or forgotten locking screws.
Take your time. A wall mount for 24 inch tv setups is a small project, but it’s one of those home jobs where patience shows in the final result.
Finishing the Job with Smart Cable Management
A mounted screen looks finished only when the cords look intentional. For a family command center, cable management matters even more because the screen usually stays powered all day.
Loose cords turn a tidy wall into visual clutter. They also create something children may pull, pets may notice, and adults may catch with a bag or vacuum handle.

The easiest fix
For most families, a paintable cord raceway is the simplest answer. It runs on the wall surface, covers the cords, and makes the setup look much more deliberate.
This is a good option if you want a neat result without opening the wall. It’s also helpful in rentals or in homes where you want flexibility later.
The cleaner built-in look
If you want the floating-screen look, in-wall cable management is the polished option. It hides the path almost completely and keeps the wall visually quiet.
Just be careful not to treat this as a shortcut job. Power routing needs to be handled properly and safely. If you’re trying to avoid wall damage while still improving appearance, advice used for other hanging projects can help too. This guide to damage-free mirror hanging has useful principles about planning placement and protecting finishes before you commit.
Why this last step matters
Cable management does three jobs at once:
- It improves safety: Fewer exposed cords means less pulling and snagging.
- It improves function: You can clean around the area more easily.
- It improves appearance: The screen looks integrated into the room instead of temporarily parked on the wall.
If you want ideas for making cords less visible without making the install feel complicated, these tips for hiding TV cords during installation are worth reviewing before you call the job done.
A family hub should look calm, because that’s the feeling it’s supposed to bring into the room. Finishing the cables is often the step that gets you there.
If you're building a wall-mounted family command center and want the screen itself to simplify schedules, chores, meals, and daily routines, Everblog brings those pieces together in one shared display designed for real family life.


